What Is an LLM? A Mental Model for Software Engineers
1. What happens when you send a prompt
Suppose your delivery application needs a short customer notification. You give a language model this request:
Summarize this delivery update in one sentence to notify the customer:
“Order 482 was scheduled for 18:00. The driver reports a van breakdown. The revised arrival time is 18:25.”
In one recorded run, the model answered:
The delivery was scheduled for 18:00, but the driver reports a van breakdown, so the revised arrival time is 18:25.
You might notice that it preserved the main facts, although it omitted the order number. The answer also reads more like a summary than a message addressed to the customer. The request worked well enough to look straightforward. But if you’re building this feature, you need to understand what produced that sentence and what your application still has to do.
We’ll follow this example request through a small language model to see how it generates an answer from input text: where its writing ability comes from, how it chooses the next token, and where the model ends and the application begins.
The code examples use Transformers, a Python library from Hugging Face for loading and using pretrained models and tokenizers. You can follow the explanation without running the code. The complete notebook and setup instructions are available if you want to try the examples yourself. You can also download the notebook.
2. What is an LLM, and where do its abilities come from?
A large language model is a neural network whose calculations use learned numerical values called parameters. These include weights and biases. During pretraining, the model learns from large amounts of text. It predicts how text continues, and the training process compares those predictions with the actual text. A measure of prediction error, called loss, guides how the parameters are adjusted to minimize the error. Through this process, the model learns patterns it can use to predict how new text should continue.
Using a trained model to generate a response is inference. The model uses its learned parameters to make sense of the input and then predicts the answer. For our delivery example, the prompt provides the specific facts to summarize. During this inference process, the model’s parameters remain unchanged.
To understand what happens inside the model more precisely, we need to understand what a token is. Thinking of a token as a single word in a statement can be a useful starting point, but it is not always correct. A token is a piece of text, such as a word, part of a word, punctuation, or whitespace. The model processes and generates text using these pieces. In the next section, we’ll see how our prompt is split into tokens.
For our example, we’ll use a pretrained, instruction-tuned model: Qwen/Qwen2.5-0.5B-Instruct, with approximately 494 million parameters.
Pretraining gives the model a statistical understanding of language by learning patterns in text. This alone does not ensure that it is useful for specific practical tasks. Instruction tuning is additional training intended to help the model follow instructions. During instruction tuning, a pretrained model is fine-tuned using examples of instructions and desired responses. Our model, Qwen2.5-0.5B-Instruct, is fine-tuned to follow requests, such as our summarization instruction.
For background on instruction following, see the InstructGPT paper. Qwen is a decoder-only transformer; we’ll unpack how that architecture processes our input later. I chose this model because its small size makes it practical to inspect locally. Qwen’s model card describes its architecture and training stages.
3. How text becomes model input
Tokenization
The model operates on numbers. The first component our input passes through is a tokenizer. It splits text into tokens and assigns each one an integer ID. The model has a vocabulary—a set of tokens it was trained to work with—and the number of tokens in that vocabulary is called its vocabulary size. The IDs produced by the tokenizer must match those expected by the model.
Vocabulary size counts distinct token entries; it does not count how many tokens are in a particular prompt.
Qwen’s tokenization documentation provides further detail.
With Transformers installed, you can print Qwen’s tokenizer vocabulary size, including special tokens:
from transformers import AutoTokenizer

tokenizer = AutoTokenizer.from_pretrained(
    "Qwen/Qwen2.5-0.5B-Instruct",
    revision="7ae557604adf67be50417f59c2c2f167def9a775",
)

print("Tokenizer vocabulary size:", len(tokenizer))
Our prompt becomes these 49 decoded pieces. Quotes delimit pieces; leading spaces belong to them, and \n represents the newline:
['Sum', 'mar', 'ize', ' this', ' delivery', ' update',
 ' in', ' one', ' sentence', ' to', ' notify', ' the',
 ' customer', ':\n', '“', 'Order', ' ', '4', '8', '2',
 ' was', ' scheduled', ' for', ' ', '1', '8', ':', '0',
 '0', '.', ' The', ' driver', ' reports', ' a', ' van',
 ' breakdown', '.', ' The', ' revised', ' arrival',
 ' time', ' is', ' ', '1', '8', ':', '2', '5', '.”']
For example, Sum, mar, and ize have IDs 9190, 5612, and 551. These numbers are lookup indices, with no inherent ranking or meaning.
To try tokenizing the prompt yourself, use the tokenizer loaded above:
prompt = (
    "Summarize this delivery update in one sentence to notify the customer:\n"
    "“Order 482 was scheduled for 18:00. The driver reports a van breakdown. "
    "The revised arrival time is 18:25.”"
)

token_ids = tokenizer.encode(prompt, add_special_tokens=False)

print("Token count:", len(token_ids))
print("Token IDs:", token_ids)
Preparing the prompt for the model
To prepare our input as a chat prompt, we use a chat template. It formats the system instructions and user message, and marks where the model’s response should begin. Each model expects a particular conversation format. For our Qwen example, we format the messages like this:
USER_PROMPT = prompt  # Reuse the delivery prompt defined above.

MESSAGES = [
    {'role': 'system', 'content': 'You are a helpful assistant.'},
    {'role': 'user', 'content': USER_PROMPT},
]

formatted_prompt = tokenizer.apply_chat_template(
    MESSAGES, tokenize=False, add_generation_prompt=True,
)
print(formatted_prompt)
Output — the formatted chat prompt:
<|im_start|>system
You are a helpful assistant.<|im_end|>
<|im_start|>user
Summarize this delivery update in one sentence to notify the customer:
“Order 482 was scheduled for 18:00. The driver reports a van breakdown. The revised arrival time is 18:25.”<|im_end|>
<|im_start|>assistant
The system message and role boundaries bring the total to 68 tokens. The final assistant prefix marks where the reply should begin. These formatting details are part of the actual input, even though a chat interface may hide them.
Hugging Face’s chat-template guide explains this formatting step.
From token IDs to embeddings
Tokenizing the complete chat prompt gives us 68 token IDs. Each ID identifies a piece of text. To process it, the model looks up a learned vector—a list of numbers—called an embedding. These embeddings are stored in the model’s input embedding table, whose values were learned during training. In our Qwen model, each row contains 896 values, so looking up our 68 token IDs gives us 68 vectors of 896 values each.
The numbers in an embedding are learned parameters. Together, they form a representation the model uses to process a token; individual values generally do not have simple, human-readable meanings.
These are the model’s starting representations of the input; they have not yet incorporated the surrounding text. A repeated token ID starts with the same embedding at each position. As the model processes the sequence, it also uses position information to distinguish where tokens appear. In the next section, we’ll see how it updates these representations using the surrounding text.
Here are the starting embeddings for three token positions in our prompt:
| Token ID | Token piece | Starting embedding |
|---|---|---|
| 9691 | ' delivery' |
[0.0200, -0.0271, -0.0009, …] |
| 5579 | ' driver' |
[-0.0011, -0.0030, 0.0325, …] |
| 29985 | ' breakdown' |
[-0.0240, -0.0063, 0.0153, …] |
Only the first three of each vector’s 896 values are shown, rounded to four decimal places. The quoted token pieces include their leading spaces.
Hugging Face’s causal language modeling guide explains the underlying next-token setup.
4. How the model processes the prompt
So far, each token’s embedding was looked up using only its ID. The model now needs to update these representations according to the context we have provided—our input prompt.
Our Qwen model uses a transformer architecture with 24 blocks, also called transformer layers. Other models can have different numbers of blocks. The token representations pass through these blocks one after another. The first block receives the starting embeddings; each later block receives the representations updated by the previous block.
Within each block, attention calculates weights for combining information from permitted token positions. These weights let different positions contribute different amounts to a token’s updated representation. Other operations in the block also transform the representations before passing them to the next block.
The original Transformer paper introduced the transformer architecture.
A position is a token’s place in the sequence. In this causal model, a position can use itself and earlier positions, but cannot use later ones. This restriction prevents a prediction from looking ahead at future tokens. The first position still undergoes computations; the last input position can use the whole supplied prefix—the input up to that position.
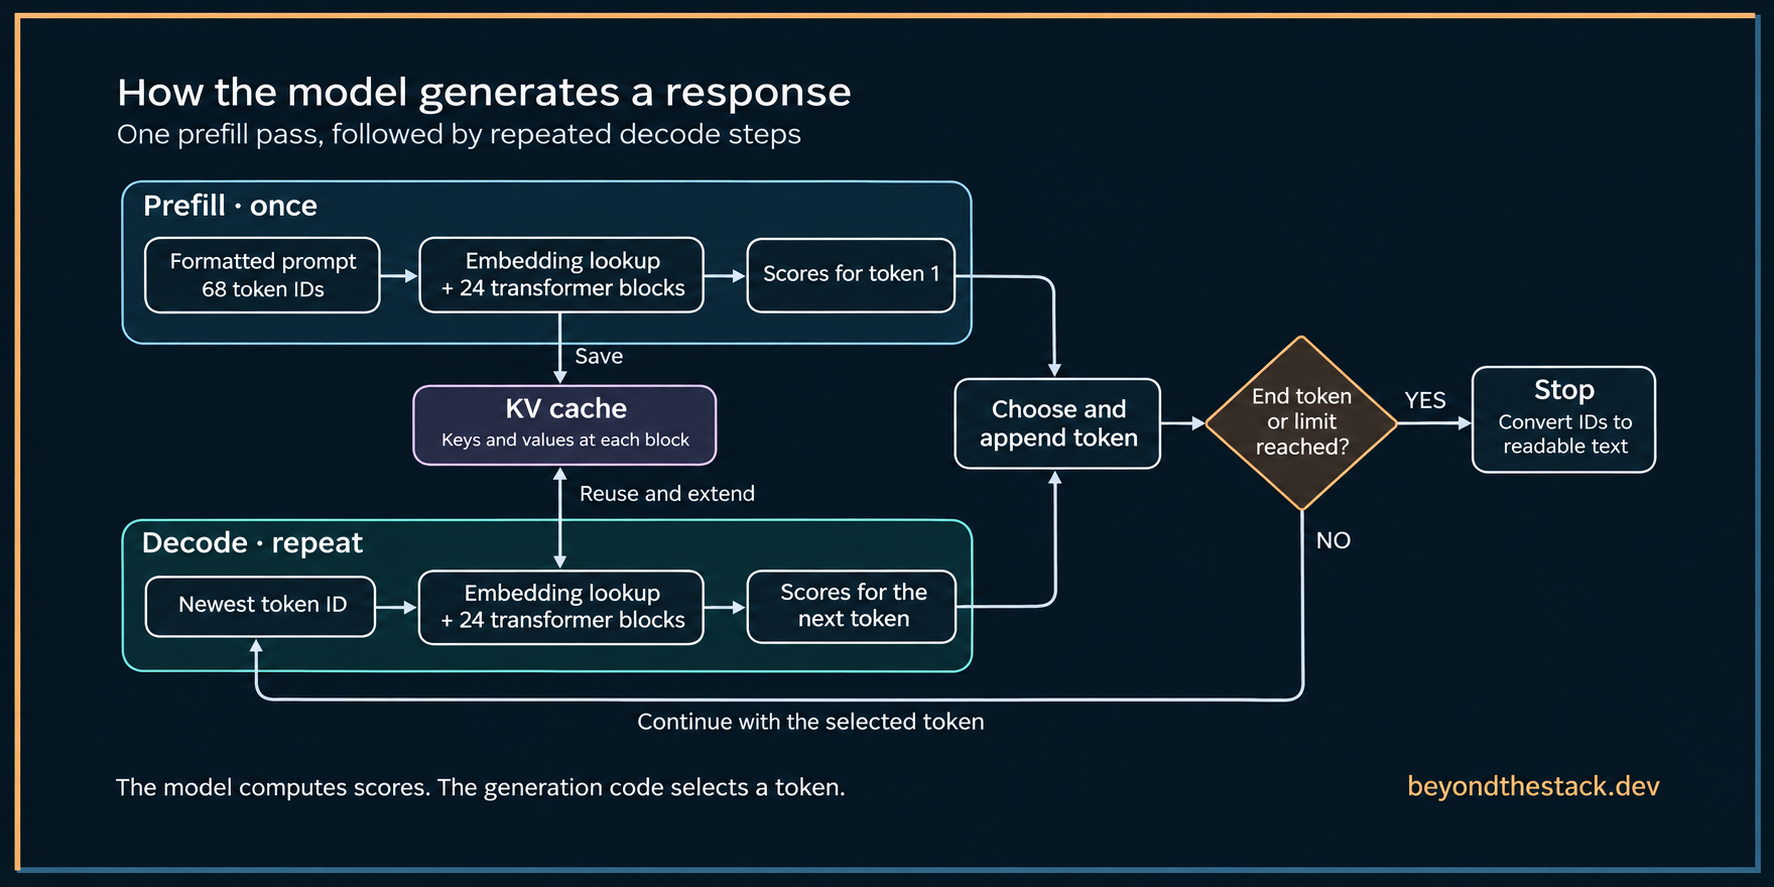
This processing of the complete input is part of prefill, the model’s first forward pass. After all 24 blocks, we still have one 896-value representation for each of our 68 input positions, but the values now incorporate information from their permitted context. These are updated representations of the input; no answer token has been selected yet. The next step is to turn the last position’s representation into scores for the first answer token, which we’ll cover in Section 5.
These representations inside the model are also called hidden states. The notebook lets us inspect them. At the block boundaries, they retain the same width, while their values change. We cannot infer from a single coordinate that the model has “understood the breakdown,” or assign responsibility for the answer to a particular block without further evidence.
For three token positions in our prompt, the change looks like this:
| Token ID | Token piece | Starting embedding | Updated representation |
|---|---|---|---|
| 9691 | ' delivery' |
[0.0200, -0.0271, -0.0009, …] |
[1.1660, -14.2809, 1.1537, …] |
| 5579 | ' driver' |
[-0.0011, -0.0030, 0.0325, …] |
[-0.6950, -5.3434, -4.7982, …] |
| 29985 | ' breakdown' |
[-0.0240, -0.0063, 0.0153, …] |
[0.3024, -8.5517, -0.5254, …] |
These are measured values from our pinned model and complete 68-token input. Only the first three of each vector’s 896 values are shown, rounded to four decimal places. The updated representations are taken after all 24 blocks and the model’s final normalization. The quoted token pieces include their leading spaces.
5. How an answer is generated
We now need to turn the updated input representations into an answer, one token at a time. At each step, the model calculates scores for possible next tokens, and a decoding strategy chooses the winner. The first answer token is chosen using scores produced by prefill; later predictions use repeated decode steps.
The model’s final output layer, named lm_head in this implementation, uses learned weights to turn the last position’s representation into logits: unnormalised numerical scores for possible next token IDs. Here it produces 151,936 scores, matching the model’s configured vocabulary size. That configured capacity can exceed the tokenizer’s count of assigned tokens.
In our formatted input, the last token is the newline (\n, ID 198) after the assistant header. Its representation has already been updated using the full supplied prefix. The path from that token to the scores is:
Last input token: '\n' (ID 198)
    ↓ 24 transformer blocks and final normalization
Updated vector: [-3.9796, -18.9699, 2.6536, …] — 896 values
    ↓ lm_head uses its learned weights and all 896 values
151,936 logits — one score per possible token ID
Only the first three vector values are displayed here. The output layer uses the whole vector to calculate every score.
Softmax converts the scores into probabilities that sum to one across the full output. In our saved run, the leading candidates for the first answer token were:
| Token ID | Token | Logit | Probability |
|---|---|---|---|
| 785 | The | 17.2381 | 29.84% |
| 4431 | Order | 16.1772 | 10.33% |
| 32 | A | 16.0916 | 9.48% |
| 5501 | Please | 15.7642 | 6.84% |
| 38121 | Delivery | 15.6690 | 6.21% |
For our example, I have used greedy decoding in the companion notebook to keep the first walkthrough simple. This strategy selects the token ID with the highest score, so our first selected token is The. The model calculates the scores; the generation code applies the selection rule. Greedy selection can use logits directly—we calculate probabilities to make the candidates easier to inspect.
The selected ID is appended to the sequence. To predict the following token, a decode step looks up The’s embedding and processes its position through all 24 blocks. During prefill, each block saved its attention keys and values for the input positions in a KV cache. Each decode step reuses those saved results for earlier positions and adds keys and values for the new position. This avoids repeating calculations for the earlier positions. The model’s learned parameters remain fixed while the cache grows. Hugging Face’s caching explanation covers this reuse.
The next prediction now has The in its context. Its leading candidates include delivery at 24.35%, customer at 20.25%, and driver at 18.14%. Greedy selection chooses delivery. The first eight actual selected pieces are:
'The', ' delivery', ' was', ' scheduled', ' for', ' ', '1', '8'Joining them gives The delivery was scheduled for 18. The answer takes shape through repeated predictions. Each selected token changes the prefix for the following prediction.
This process is called autoregressive generation: each generated token becomes part of the context used to predict the next one.
Greedy decoding is one way to choose the next token. Another is sampling, which draws a token according to a probability distribution. Higher-probability tokens are more likely to be selected, but the highest-scoring token is not always chosen. Before softmax converts the scores into probabilities, the logits are divided by a positive temperature value. Lower temperatures concentrate probability on higher-scoring candidates, while higher temperatures spread it more widely. A temperature of 1 leaves the logits unchanged. Hugging Face’s sampling explanation illustrates this effect and shows how to use temperature in code.
The loop stops when an end-of-response token is selected or a configured limit is reached. Our limit is 64 new tokens; hitting it would not establish that the answer was complete.
The tokenizer converts the generated token IDs back into readable text.
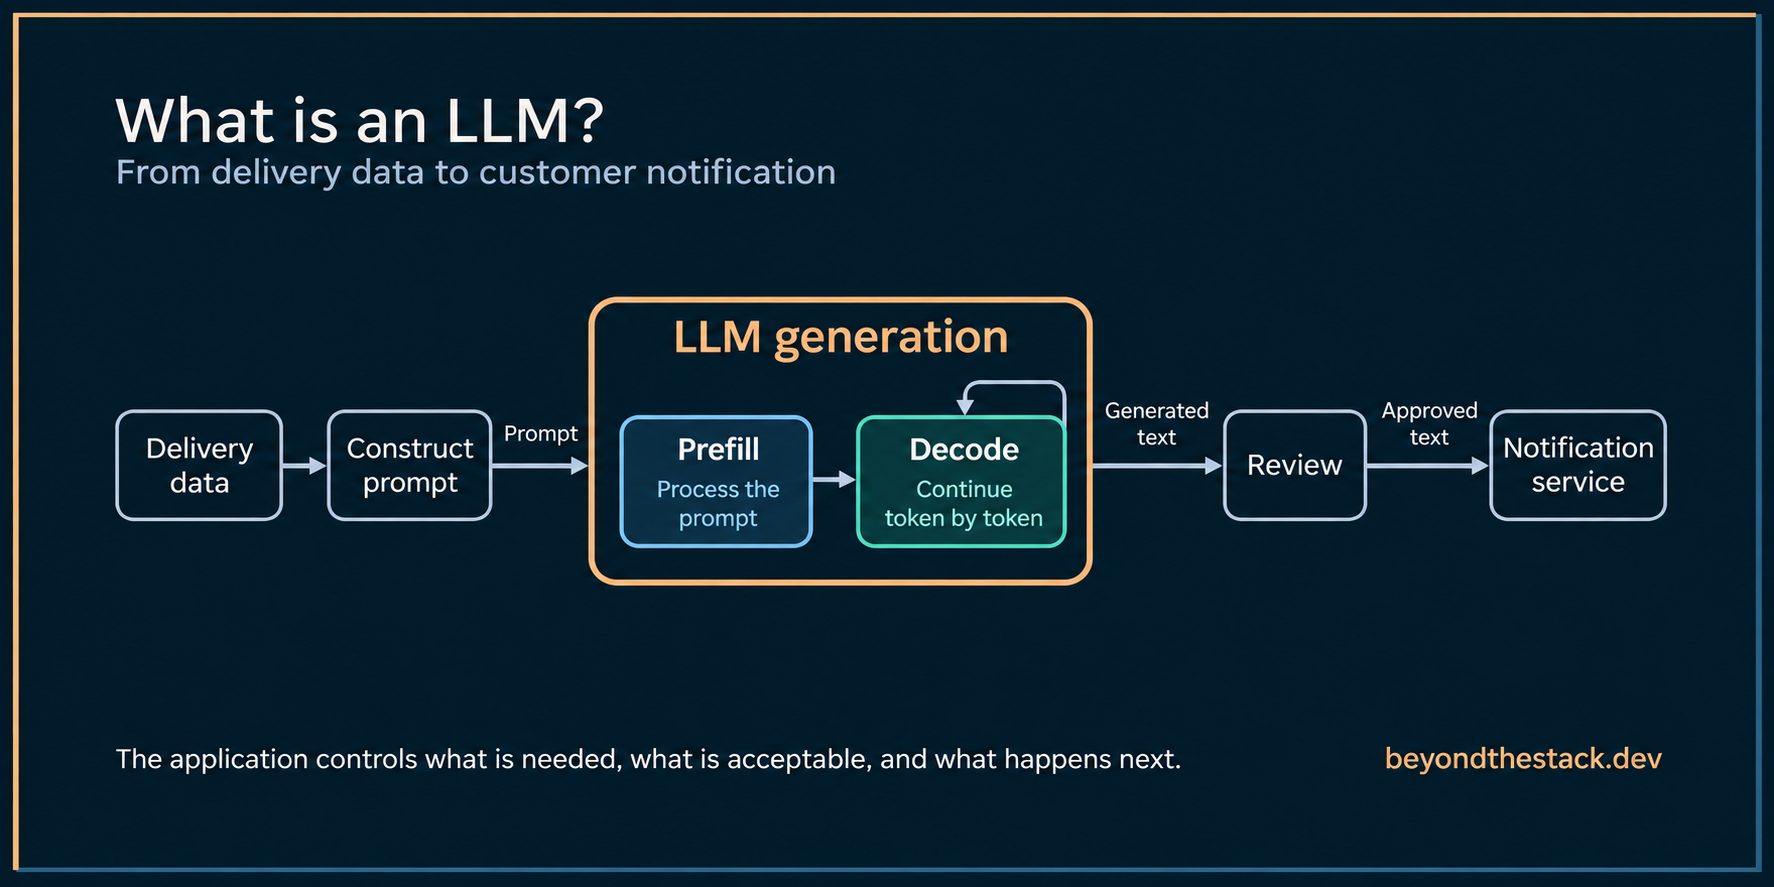
6. The model is one component—focus on designing the system
We have seen an LLM generate an answer from the input we supplied. In a software application, that is one component in a much bigger flow:
Delivery data → construct prompt → model → review → notification serviceWe decide where the delivery data comes from, what information goes into the prompt, and what an acceptable response must contain. We also decide what happens after generation: whether the answer is sent, rejected, or passed to someone for review. The model’s ability to produce fluent text does not settle those decisions for us.
The review step is especially important. Our opening response sounded reasonable but omitted the order number. For this notification, a reviewer should check the order number, revised arrival time, explanation for the delay, and whether the wording suits a customer. Checking only for the strings 482 and 18:25 would be insufficient: an answer can contain both while describing a pickup instead of an arrival. We need to check meaning as well as formatting.
That review can combine automated checks and human judgment, depending on the task. It also needs a defined outcome when a check fails—for example, hold the notification for a person to correct rather than send it automatically. Asking another model to review the answer can help, but its verdict can also be wrong. The review mechanism itself needs to be tested against examples of acceptable and unacceptable outputs.
The responsibility for a reliable application lies with us—in how we design and test the whole flow. Choosing a capable model matters. So do the context we provide, the checks we apply, and the actions we allow. Generating an answer, accepting it, and acting on it are separate steps; our software connects them.
Further reading
To inspect the actual inputs and outputs, open the companion notebook and setup guide. For further reading, start with the causal language modeling and chat-template guides linked above, then explore generation and caching. Tokenization algorithms and attention calculations are useful next topics once this overall path is clear.